Ohrmikrofone für PRC Funkgeräte / whisper mike (ear mike) EM-200 Magnum for PRC-Radios US ARMY
NSN: 5965-01-187-3078
P/N: EM200/EM-CS-PRC
Microphon im Ohr Zubehör für PRC Radios mit U-229 connector wie z. B
PRC-68, PRC-77, RT-524, RT-246, R-442, usw. Somit hat man die Hände frei und keine störenden Nebengeräusche.
Funktioniert über die Schwingungen des Ohrknochens. Sie sprechen und hören durch das Ohr!
Alternativ im PTT Modus zu betreiben. Stromversorgung 1x AA 1,5 Volt Batterie ( nicht im Lieferumfang enthalten)
MODEL EM-200 EAR-MIKE®
TRANSDUCER SYSTEM
USER INSTRUCTIONS
INTRODUCTION
The Telex Model EM-200 Ear-Mike® Transducer System is a totally new concept in hands-free, two-way communication. It is based on a special miniature transducer which functions as both a microphone and an ear- phone. This transducer is able to convert minute voice vibrations, present in the ear canal during speech, into signals suitable for radio transmission. At the same time, the transducer functions as an earphone for radio reception. You can actually talk and listen through your ear.
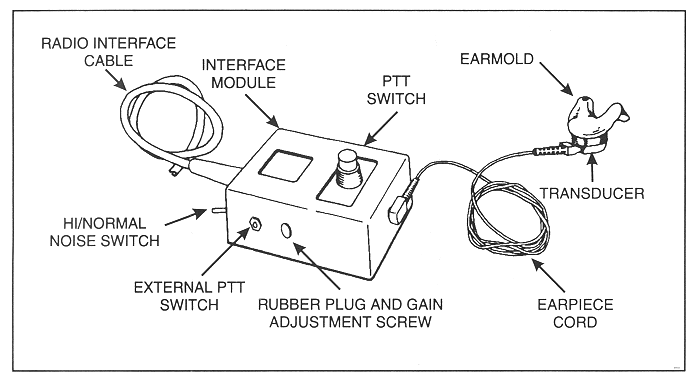
The Ear-Mike Transducer System consists of the transducer, an earpiece cord, an earmold, and an interface module (see illustration). A separate radio interface cable connects the Ear-Mike Transducer System to the radio. (Cables are available to interface the Ear-Mike Transducer System to a wide variety of radios.) The transducer snaps onto the earmold which is then inserted into the ear. The earpiece cord plugs into the transducer and the side of the interface module.
The interface module contains a microphone amplifier. Operating power for the amplifier is supplied by a single, AA-size battery (already installed). The Push-To-Talk (PTT) switch activates the amplifier for speech output to the radio and also keys the radio for transmission. An external PTT switch jack is also provided for use with an optional remote PTT switch. The HI/NORMAL noise switch, located on the end of the module, sets the microphone gain for best performance in either normal-noise or high-noise environments. Additionally, a gain control is provided to adjust the output level for use with various radios. This control is accessible by removing the rubber plug from the side of the interface module.
OPERATION
NOTE
If the Ear-Mike Transducer System is being used for the first time, make sure that the gain is properly adjusted. See Microphone Gain Adjustment section.
1. Assemble the components as shown in the illustration below, and plug the radio interface cable (ordered separately) into the radio.

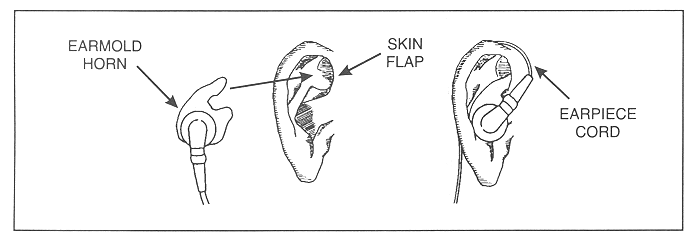
2. Insert the earmold into the ear using a gentle twisting motion. Make sure that the horn (pointed part) of the earmold is behind the skin flap at the front of the ear. Run the earpiece cord up over the ear and down behind. The ear now becomes your cord restraint.
NOTE
The Ear-Mike Transducer System comes with a No.4 (medium-size) right earmold. Other earmold sizes, as well as custom earmolds, are available for either the right or left ear. (A custom earmold is highly recommended.) Consult your Ear-Mike Transducer System dealer for further information.
3. Attach the interface module to a convenient place on your body.
4. Turn on the radio, and adjust radio volume and squelch as desired. The Ear-Mike Transducer System is now ready for use.
5. To transmit, press and hold the PTT switch and begin talking.
6. To receive, release the PTT switch.
7. Set the HI/NORMAL noise switch to NORMAL if background noise is not excessive. If background noise is a problem during transmission, set the switch to the HI position. Use hearing protectors in high-noise environments.
MICROPHONE GAIN ADJUSTMENT
NOTE
Ear-Mike Transducer Systems require a special gain adjustment procedure, different from that used for conventional microphones. Infact, adjusting Ear-Mike Transducer System gain is simpler because oscilloscopes and other electronic equipment are not needed to set the proper deviation. All that is required are two radios and a small (No. 0) flat-blade screwdriver. Please note that this procedure provides the optimum gain for a particular user based on the type of earmold used and how well the earmold is fitted to the ear. For best results, the EM-200 should be adjusted for the person currently using it.
1 . Prepare the Ear-Mike Transducer System for use as described in Operation. (The radio you connect the Ear-Mike Transducer System to will function as the transmitter.) Set the HI/NORMAL gain switch to NORMAL.
2. Position a second radio (to be used as a receiver) approximately 6 feet (1.8 m) from the first radio, and face it away from you. Set the second radio to half volume.

3. Remove the rubber plug from the gain adjustment hole on the interface module.
4. Press-and-hold the PTTswitch, and note the output from the receiver:
a. If feedback squeal is noted, insert the small, flat-blade screwdriver through the gain adjustment hole, and slowly rotate the gain adjustment control counterclockwise until the feedback squeal just stops.b. If no feedback squeal is noted, insert the screwdriver through the gain adjustment hole, and rotate the gain adjustment control clockwise until squealing just starts; then rotate the control counterclockwise just far enough to stop the squealing.
NOTE
The gain adjustment control is capable of 12 full turns. When the end is reached, a soft clicking can be heard. If your radio requires more gain, a simple internal modification of the EM-200 will have to be performed. Contact your dealer for further information.
5. After adjusting the gain, check operation by talking in a normal voice and noting the output from the receiver. Then whisper and note the output. In both cases, the output should be clear and crisp. If not, repeat step 4.
6. Replace the rubber plug. The Ear-Mike Transducer System is now ready for use.
BATTERY REPLACEMENT INFORMATION
The Ear-Mike Transducer System comes with a single, AA-size, 1.5-volt battery already installed. Battery power is only used when the PTT switch is pressed, and in normal use the battery can last for more than one year. However, battery replacement at six-month intervals is recommended to assure continuous operation. The battery may be accessed for replacement by removing the four phillips screws on the back of the unit and then lifting off the back plate.
SPECIFICATIONS
HI/NORMAL Switch 12 dB level change
Battery 1.5-volt, AA-size
Battery Current Less than 2.5 mA with PTT switch pressed; otherwise zero
Dimensions 3.1 x 2.2 x 1.0 inches (79 x 56 x 25 mm)
Weight 5.5 oz (156 grams)
TELEX
TELEX COMMUNICATIONS, INC. 9 12000 Portland Ave. S., Burnsville, MN 55337 U.S.A.
38109-270 Rev G March 2001

 Deutsch